

How To Use Voice Meeter
VoiceMeeter Potato is donationware created past VB-Sound. It functions as a virtual audio mixer that allows you to control every attribute of your PC'southward sound. Potato is larger and more functional when compared to its two smaller cousins, Vocalisation Meeter and VoiceMeeter Banana.
Vocalization Meeter allows you lot to command each audio device on your arrangement separately. Y'all tin road communication software like Discord and Game chat to one input and game audio and music to other inputs, giving you lot the liberty to control each sound discreetly. If you lot've e'er wondered how some of your favorite streamers can talk to their chats without teammates hearing them or lower their in-game audio on stream while yet able to hear information technology themselves, then look no further.
How to Fix Upwards Voicemeeter
You can download VoiceMeeter Irish potato from Hither. You volition also need to download and install the Virtual Audio Cablevision software to have an actress option to route more of your audio. Once they're downloaded and installed, restart your computer and permit's become them setup!
-
Step 1 – Setup Your Default Playback Devices
First, you should caput over to your windows sound settings and fix up some defaults for windows. Open the sound control panel past striking the windows key and typing in sounds, or past right clicking the volume icon in the taskbar and selecting sounds.
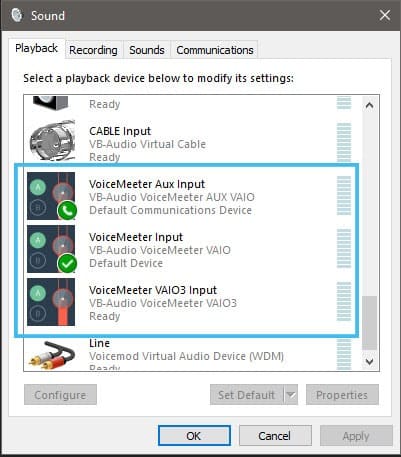
Click on the playback tab and roll down to the VoiceMeeter Input, correct click, and select "Set as Default Device". Next, nosotros'll correct click the VoiceMeeter Aux Input and select "Set as Default Advice Device."
-
Step ii – Setup Your Default Recording Devices
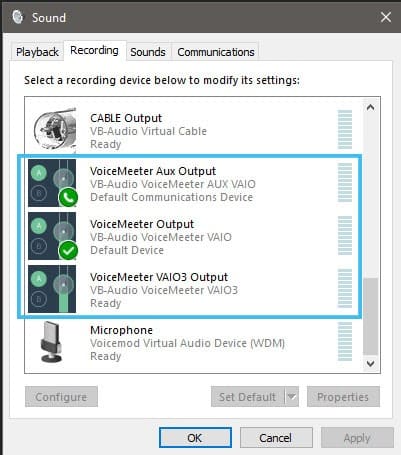
We'll caput over to the Recording tab and practise the aforementioned. Right-click the VoiceMeeter Output and select "Set equally Default Device" and right-click the VoiceMeeter Aux Output and select "Set up every bit Default Communication Device". Now Windows knows where to transport it's default desktop audio and where the communications sound should be sent, nosotros can shut this window.
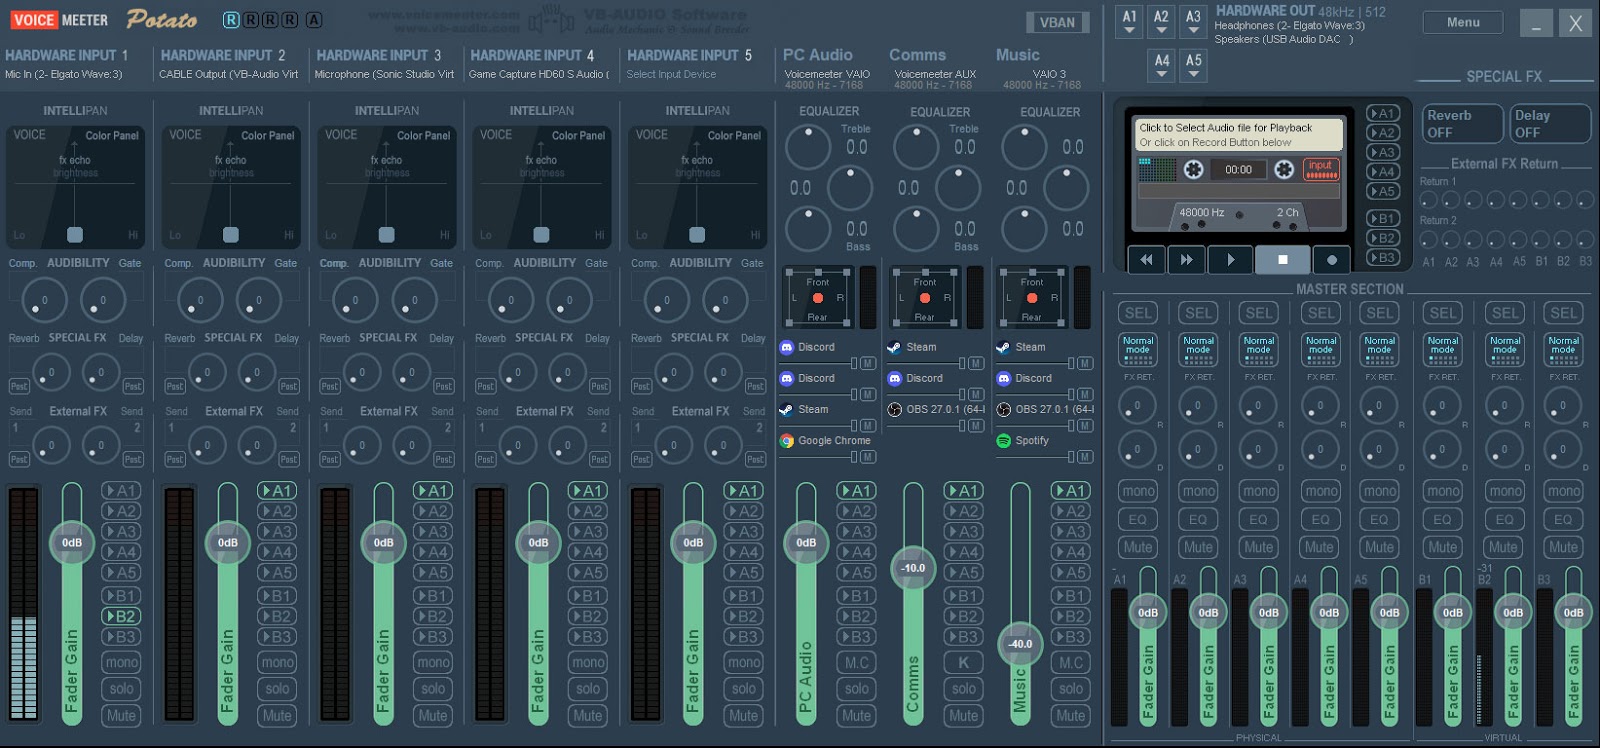
Now we tin can open VoiceMeeter White potato and look at some of its features. The UI is divided into sections, the far left is Hardware Inputs. This section is where we'll set upward whatever hardware devices that nosotros take too as the virtual audio cable that we downloaded.
The center section is the virtual audio inputs, here we'll route our pc audio, communications audio, and music. The far correct is where the sound outputs are, the tiptop section is the hardware outputs such equally headphones or speakers and the bottom is the principal output section where we tin can send all our inputs to.
-
Step iii – Assign Hardware Inputs
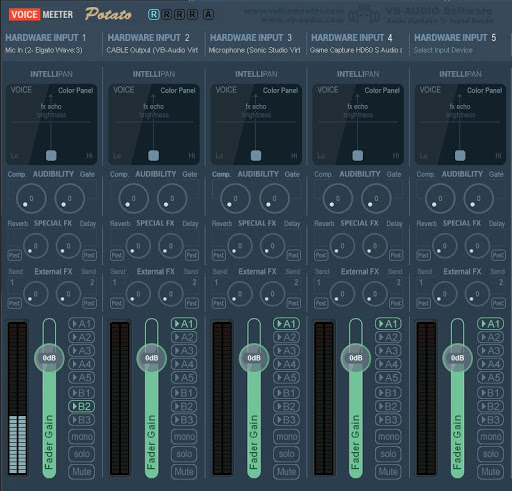
Under the Hardware input department, you lot can correct click to rename each input and left click to select what device you want routed in that location. So right-click Hardware Input ane and name it Microphone, and then left-click and select your microphone from the list, I would suggest sticking with WDM as these are the drivers with the lowest latency for Windows.
Practise the same for Hardware Input two simply select the virtual audio cable. This can be used for a few different sources like Chrome or other web browsers, or any other application that outputs audio, but I would propose sending your game audio here so you can control this separately for your stream and yourself.
-
Step 4 – Assign Virtual Inputs
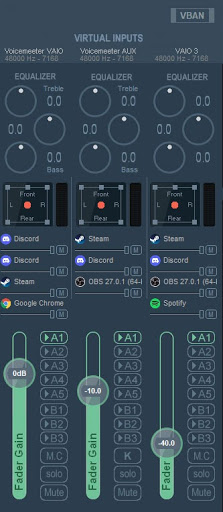
Adjacent, we'll bargain with the virtual audio inputs. Correct click virtual input 1 and name this PC Audio, this is where windows will send all its audio by default (the one we prepare before in the sound control panel). Virtual Input 2 we'll rename to Communication, this is where we told Windows to send all our communication traffic, and so Discord, Zoom, Skype, and even most in-game conversation will go sent here automatically. Lastly, rename Virtual Input 3 to Music, this is where we volition ship apps like Spotify, Chrome, and other sources that y'all can use for music.
-
Step 5 – Select Hardware Outputs
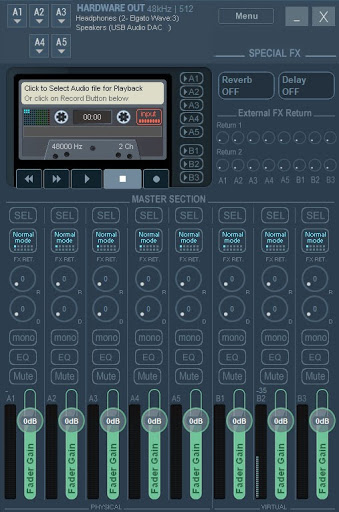
Now we can set our Hardware outputs. Almost the elevation correct of the app, you will come across "Hardware Out" and A1 through A5. Click A1 and select your headphones, now every input that has A1 selected under it will output to your headphones. If you have speakers or anything else that plays audio yous can select it here under A2 through A5.
Make sure that y'all have A1 selected under every input except for your mic, which will be sent to B2, and you lot should exist able to hear all your devices now.
-
Pace 6 – Road each applications sound to the correct input
The concluding thing that you need to do is route specific applications to the correct Voice Meeter input. So, make sure that whichever application that you desire to route is open up and playing audio of some kind. Open the sound settings menu by pressing the windows key and typing sound settings or right click on the volume icon in the job bar and click audio settings. Now scroll to the lesser and click on "Advanced Sound Options". Here you can change the default output of each application, for case, if you use Spotify, make sure that it is open and playing audio, it will show up on the listing here. Modify the output to Voice Meeter VAIO3 input, and now Spotify volition ship its audio to that virtual input in Vocalisation Meeter.
Voicemeeter Features and Options
Now that yous have VoiceMeeter setup, you can control each audio source independently to go the best mix while you stream and play games. When it comes to setting up OBS, just keep in mind that y'all tin can at present add together each of these inputs as their ain audio output source for whatever of your scenes, and OBS will control the book that your stream hears whereas Phonation Meeter will control the book that you lot hear.
Frequently Asked Questions
-
Subheading
Lorem ipsum dolor sit amet
Tony
Tony, besides known as Anubys, is a Twitch streamer and aspiring Youtuber from Toronto Canada. He is completing a caste in IT from York Academy, and enjoys combining his technical background with his dear for video games to make crawly videos and dandy-looking streams! When he's not busy with coding for school or taking care of his 2 young children, y'all can most likely find him in Verdansk going for another Battle Royal victory!

How To Use Voice Meeter,
Source: https://www.streamscheme.com/how-to-use-voicemeeter/
Posted by: mcnealaune1955.blogspot.com
0 Response to "How To Use Voice Meeter"
Post a Comment